

This idea came to me from my daughter again, she has a wealth of fabulous ideas. Nine years of attending Forest School at least once per week will do that to a kid. She has fond memories of doing this during her years of Forest School. She finds it a really relaxing activity and loves the way the end product looks. She has had many of these decorating her room over the years.
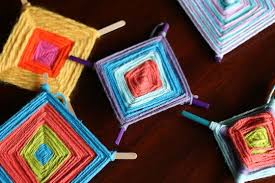
God’s Eye
You will need:
- Two sticks
- the length and thickness will depend on what size you want your project to be
- you can also use popsicle sticks, craft sticks or any other substitute you can think of or have lying around.
- you can use more than two sticks, it just makes it trickier to get started but the end result is so worth it
- wool, yarn or string of different colours
- glue (optional)
- scissors
How to make your God’s Eye:
- When you head out for your walk today choose two sticks that will make up the frame for your project.
- Cross your sticks at the middle of both to make an ‘x’ shape. You can put a drop of glue in between to make a more rigid frame if you like but this is not necessary.
- Simply start by winding the wool around the sticks at the middle where they cross, side to side across the ‘x’ you have made and then top to bottom. It does not need to be super secure just holding the sticks together enough to wrap the wool around without them coming apart.
- Now wrap the wool around the sticks one at a time making sure you wrap in the same direction around each stick as you make your way around the sticks. So if you wrap your wool under the first stick move around to the next one and wrap your wool under. It does not matter if you wrap over or under as long as you do it the same way each time.
- When you want to change colours you simply cut the wool of the colour you are working with, tie the end onto the end of the next colour and keep wrapping in the same way.
This is much easier to understand if you see it in action. I found this really helpful video from Red Ted Art that explains and demonstrates the process very well.
We would love to hear from you if you decide to try this one. Show us what colours you use. Take pictures of you working away and share them with us or post your finished products on our Facebook, twitter and/or instagram pages.
Happy weaving!
April


Leave a Reply